设计模式之单例模式
模式概述
定义:指一个类只有一个实例,且该类能自行创建这个实例的一种模式。
核心作用:保证一个类只有一个实例,并且提供一个访问该实例的全局访问点。
优点:
- 单例模式可以保证内存里只有一个实例,减少了内存的开销。
- 可以避免对资源的多重占用。
- 单例模式设置全局访问点,可以优化和共享资源的访问。
缺点:
- 单例模式一般没有接口,扩展困难。如果要扩展,则除了修改原来的代码,没有第二种途径,违背开闭原则。
- 在并发测试中,单例模式不利于代码调试。在调试过程中,如果单例中的代码没有执行完,也不能模拟生成一个新的对象。
- 单例模式的功能代码通常写在一个类中,如果功能设计不合理,则很容易违背单一职责原则。
常见的五种单例模式实现方式:
- 主要:
- 饿汉式(线程安全,调用效率高。但是,不能延迟加载。)
- 懒汉式(线程安全,调用效率不高。但是,可以延迟加载。)
- 其他:
- 双重检测锁式(由于JVM底层内部模式原因,偶尔会出问题。不建议使用。)
- 静态内部类式(线程安全,调用效率高。但是,可以延迟加载。)
- 枚举单例(线程安全,调用效率高,不能延迟加载)
模式的结构与实现
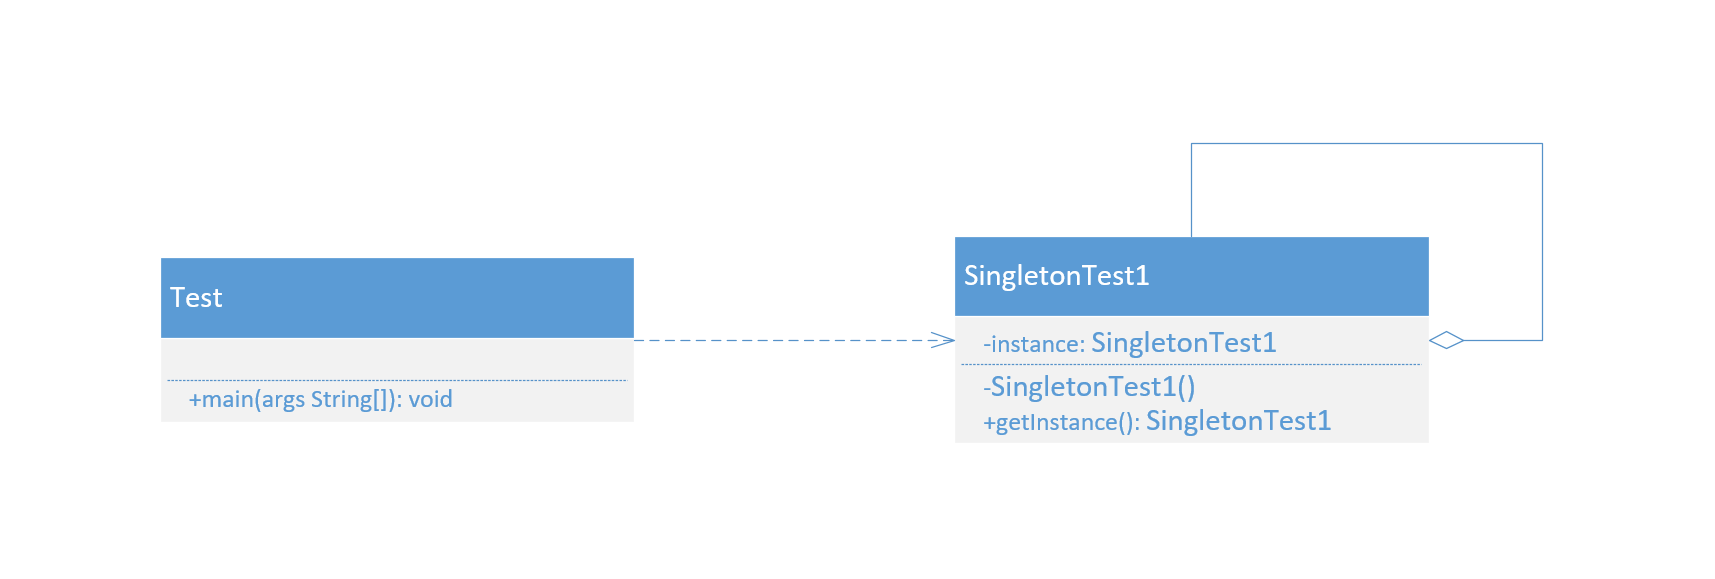
- 单例类:包含一个实例且能自行创建这个实例的类。(如下图“SingletonTest1”)
- 访问类:使用单例的类。(如下图“Test”)

饿汉式
1
2
3
4
5
6
7
8
9
10
11
12
13
14
|
public class SingletonTest1 {
private static SingletonTest1 instance = new SingletonTest1();
private SingletonTest1() {}
public static SingletonTest1 getInstance() {
return instance;
}
}
|
懒汉式
1
2
3
4
5
6
7
8
9
10
11
12
13
14
15
16
17
|
public class SingletonTest2 {
private static SingletonTest2 instance;
private SingletonTest2() {}
public static synchronized SingletonTest2 getInstance() {
if (instance == null) {
instance = new SingletonTest2();
}
return instance;
}
}
|
双重检测锁式
1
2
3
4
5
6
7
8
9
10
11
12
13
14
15
16
17
18
19
20
21
22
23
24
25
26
27
28
29
30
31
32
33
34
35
36
37
38
|
public class SingletonTest3 {
private static SingletonTest3 instance;
private SingletonTest3() {}
public static SingletonTest3 getInstance() {
if (instance == null) {
synchronized (SingletonTest3.class) {
if (instance == null) {
instance = new SingletonTest3();
}
}
}
return instance;
}
}
|
静态内部类式
1
2
3
4
5
6
7
8
9
10
11
12
13
14
15
16
|
public class SingletonTest4 {
private static class SingletonClassInstance {
private static final SingletonTest4 INSTANCE = new SingletonTest4();
}
private SingletonTest4() {}
public static SingletonTest4 getInstance() {
return SingletonClassInstance.INSTANCE;
}
}
|
枚举式
1
2
3
4
5
6
7
8
9
10
11
12
13
14
15
16
17
18
19
20
21
22
23
24
25
26
27
28
29
30
31
32
33
34
35
36
37
|
public enum SingletonTest5 {
INSTANCE;
public void singletonOperation() {
}
public static void main(String[] args) throws Exception {
File file = new File("test.txt");
ObjectOutputStream oos = new ObjectOutputStream(new BufferedOutputStream(new FileOutputStream(file)));
oos.writeObject(INSTANCE);
oos.flush();
ObjectInputStream ois = new ObjectInputStream(new BufferedInputStream(new FileInputStream(file)));
System.out.println(ois.readObject() == INSTANCE);
}
}
|
应用场景
在以下情况下可以使用单例模式
- 系统只需要一个实例对象,如系统要求提供一个唯一的序列号生成器,或者需要考虑资源消耗太大而只允许创建一个对象。
- 客户调用类的单个实例只允许使用一个公共访问点,除了该公共访问点,不能通过其他途径访问该实例。
- 在一个系统中要求一个类只有一个实例时才应当使用单例模式。反过来,如果一个类可以有几个实例共存,就需要对单例模式进行改进,使之成为多例模式。
示例
一个具有自动编号主键的表可以有多个用户同时使用,但数据库中只能有一个地方分配下一个主键编号,否则会出现主键重复,因此该主键编号生成器必须具备唯一性,可以通过单例模式来实现。
除枚举式外其他方式如何防止通过反射和反序列化创建对象,破坏单例性
1
2
3
4
5
6
7
8
9
10
11
12
13
14
15
16
17
18
19
20
21
22
23
24
25
26
27
28
29
30
31
32
33
34
35
36
37
38
39
|
public class SingletonTest6 implements Serializable{
private static SingletonTest6 instance = new SingletonTest6();
private SingletonTest6() {
if (instance != null) {
throw new RuntimeException("禁止破坏单例性");
}
}
public static SingletonTest6 getInstance() {
return instance;
}
private Object readResolve() {
return instance;
}
public static void main(String[] args) throws Exception {
File file = new File("test.txt");
ObjectOutputStream oos = new ObjectOutputStream(new BufferedOutputStream(new FileOutputStream(file)));
oos.writeObject(getInstance());
oos.flush();
ObjectInputStream ois = new ObjectInputStream(new BufferedInputStream(new FileInputStream(file)));
System.out.println(ois.readObject() == getInstance());
}
}
|
五种实现单例模式的效率对比
| 实现方式 |
耗时 |
| 饿汉式 |
41ms |
| 懒汉式 |
223ms |
| 双重检测锁式 |
44ms |
| 静态内部类式 |
40ms |
| 枚举式 |
35ms |
1
2
3
4
5
6
7
8
9
10
11
12
13
14
15
16
17
18
19
20
21
22
23
24
25
26
|
public class SingletonTest7 {
public static void main(String[] args) throws InterruptedException {
long start = System.currentTimeMillis();
int threadNum = 10;
final CountDownLatch countDownLatch = new CountDownLatch(threadNum);
for (int i = 0; i < threadNum; i++) {
new Thread(()->{
for (int j = 0; j < 100000; j++) {
Object obj = SingletonTest5.INSTANCE;
}
countDownLatch.countDown();
}).start();
}
countDownLatch.await();
long end = System.currentTimeMillis();
System.out.println("耗时(ms):" + (end - start));
}
}
|
相关链接:
学习所得,资料、图片部分来源于网络,如有侵权,请联系本人删除。
才疏学浅,若有错误或不当之处,可批评指正,还请见谅!


